Elementor Walk Through

This guide will help you through using the Elementor integration we have setup to get the most out of the Elementor Theme Builder which is part of the Elementor Pro package.

Requires Elementor Pro Version 2.9.4 or greater

Setting up the search listing page

In WP Property Feed all properties are a special Custom Post Type called properties.  To see the property listings you therefore just need to go the the archive page for properties /properties/ on your site (no need to create a page as WordPress already has all this functionality built in).  Now that you are using Elementor Pro you may want to style the layout of this page, here’s how;

Step 1 : Create a new theme template for properties.  In wp-admin select the Templates > Theme Builder menu option

Step 2: In the select the type of template you want choose “Archive” and give the template any name you like

Click the “Create Template” and you will be taken to a library of templates.  Just press the X in the top right to close this library.

Step 3 (optional): Normally we have a search bar at the top of the property listing page and for this we have created an Elementor widget.  If you scoll down the widget section until you find the WP Property feed section then drag the Quick Search widget onto your new archive page.

Once you have this on the page you can play with all the normal Elementor settings and styling options to make it look as you want.  UPDATE: You can now use the Elementor From widget to create your own form just remember to set the “Actions After Submit” to “Property Seearch”.  

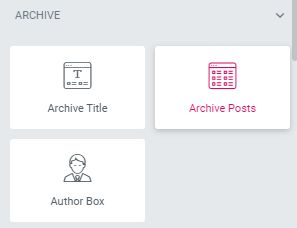
Step 4:  Add the Elementor “Archive Posts” widget to your page.

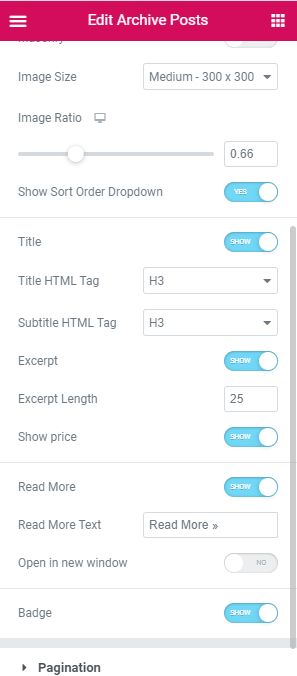
In the layout options for this widget we have created a “Property” skin to use for the display of property details and added specific options for showing the sort-order dropdown,  sub-title display (displays the type of property rooms etc), show price, and badge display (For Sale, SSTC, etc).  Again play with the settings to suit.

Step 5: Publish the template.  When you press the publish button you will be thrown to the Publish Settings dialog where you will press “ADD CONDITION” and select “Include” and “Properties Archive” to make this template apply to the property archive page only.

You will now have an Elementor template setup for your search results.  To see the template in action go to https://{yoursite.com}/property/

Setup a property details template

Next you will need a page to display the property details on a page, so that when you click through a property details you are using Elementor to style the results.

Step 7: Create a property details template

To do this again click on the wp-admin menu Templates > Theme Builder and then “Add Templete”.  This time in the template box choose “Single” and the “Properties” post type and give the template a meaningful name.

Elementor Version 3 Update: The release of version 3 of Elementor has seen the above box modified to no longer include the “Select Post Type” option.  Elementor will only now override pages that use the default page template so we have had to build in an override option in Settings > WP Property Feed > General to allow Elementor to override the base property template THIS OPTION MUST BE TICKED if you are using Version 3 or more.

Again close the library popup that appears so that you are in the Elementor designer.

Step 8: Using dynamic tags.

We have added a load of dynamic tabs to help you access the specific property details you will need to drop onto the template.  As normal you will want to add the title and description as much of the property detail information is in those two settings.  But you will also want to add specific property details which will be either text, media or galleries.

Text Tags: Text tags can be used in many places but the most common will be using the “Text Editor” widget.  If you drag a widget onto the page and look on the content tab you will see the dynamic content tag icon.

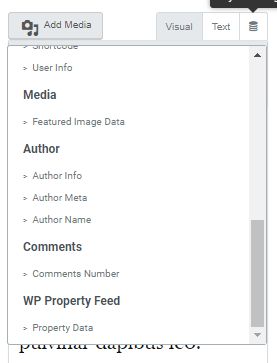
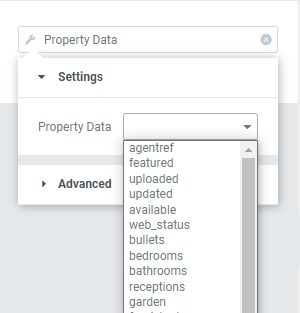
Click the cylinder button and from the drop down select “Property Data”.  Once selected you will then see a settings spanner next to Property Data which you can click on to select the specific property data you require.

You can get property data into many of the various Elementor widgets this way.

Link Tags: We have created a number of link tags for items that only appear as links in particular the Brochure PDF can be found here.  Use with button widgets or any other widget that allows linking.

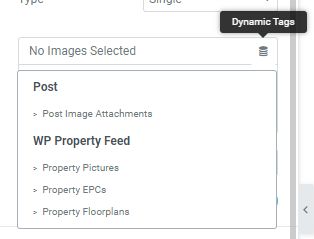
Gallery Tags:  We have also created a number of gallery tags to display the various property images, floorplans and  EPCs.  If you drop a Galley Widget onto the page you will again see the dynamic tag icon with various WP Property Feed options for these.  Try playing with these options

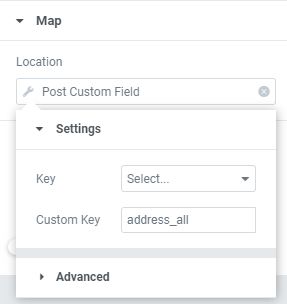
Maps: There is one special case for the Google Maps widget where you will want to add the address but the widget does not have the dynamic tags option.  Fortunately it does allow you to select a “Post Custom Field” where you can enter the Custom Key “address_all” which will pull in the full location text to render the correct location.

UPDATE: We have found that the standard Elementor map widget is not very accurate at locating properties using the address_all option and we now recomment using the “Premium Addons for Elementor” plugin which provides a much better Google Maps widget.  This widget allows you to use the longitude and latitude values we provide in the property data tags which is much more reliable.  Make sure you set both the map center and also the map marker to these longitude / latitude values.

Setp 9: Publish the template.  At the default option will be to Include Properties which will then apply this template to all properties.  At this point you could just “Save & Close” and your template for properties will be ready.  However you may choose to design different templates for different property_areas.  Property Areas (probably not well named, sorry!) are the main search divisions – to-buy, to-rent, commercial and developments.  You may want to show details of rental deposits and let types for rentals but not for sale properties so having 2 different templates will allow you to modify the layout depending on the area.  You could also do the same for Branches if you are a multi-branch agency for instance.

Setting this condition above will limit the template to Rental properties only.

Step 10:  Other widgets

You may also want to add some property widgets to other pages too.  For this there are 3 main widgets.  We have already explored the “Quick Search” widget in the archive template, but this can also be dropped into any Elementor page you wish.  You may also want to “Feature” some properties on some pages in your site.  To do this you can use either the “Posts” or “Portfolio” widgets both of which work in a similar way.  As an example we will take the “Post” widget setup.

Add a “Posts” widget to your page and in the “Layout” section select “Properties” from the “Skin” option.  This will add all the options you came across earlier in the “Archive Posts” widget, but this time you will want to select the specific properties you want to show in this widget.  To do this click on the “Query” section of the widget and select “Properties” in the “Source” setting.   To limit the properties returned to say “For Sale” properties you will click the “Include By” and “Term”, then in the “Term” box below enter “to-buy”.

You will also see an option to “Always show featured first”.  Selecting this option will override the sort order options above it and display properties specifically marked as featured followed by the newest (if we don’t have enough featured properties to fill the grid).  This is useful if you want to use the featured flag to highlight properties.

Other than that just play!

Jupix – Redirecting Match Emails to a Custom Link Structure

One of the features of Jupix is to have emails sent to clients with links to properties that match their search requirements.  By default the email will link to www.yourdomain.com/more_details.php which or cause will not exist on your WordPress site.  However our “out of the box” templates include code to capture the profileID sent in this link and redirect to the correct property on your site.  The code is placed in the property archive page which is normally the /property/ page (unless you have overridden the default property slug), so asking Jupix to change the email link to www.yourdomain.com/property/ will allow your email links to work.

Elementor Search Form Walkthrough

You can now use the Elementor Form widget to build search forms for your website, rather than using the property search widget.  Using the Elementor form builder allows much more control over the styling and layout of the search form but there are some important settings to use in order to make it work effectively.

1 Add Form widget to your page

Select the Form widget and drag this onto your page.  You will need to then add the various search options you want to your form.

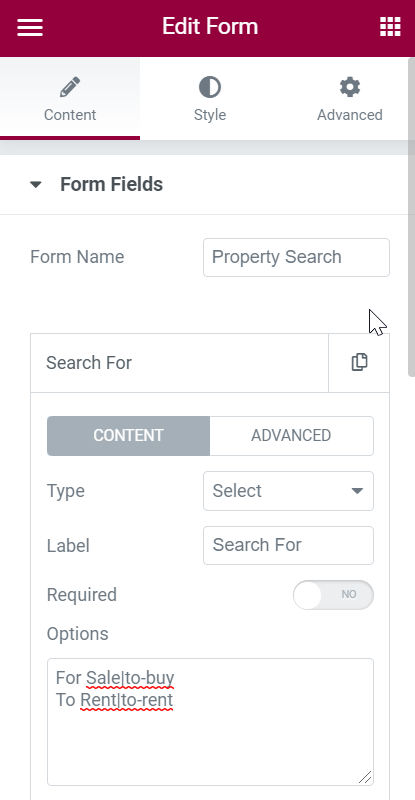
This image shows the basic settings of the first field in our form which is used to select the broad area of search we want – For Sale or To Rent in this case.  The options are the available options and values (separated by a | character) in this case are the taxonomy slugs.  There are 3 search fields that use taxonomy slugs, which are Branches, Property Areas (this one in this example and Property Types).  To get a list of the available slugs go to the “Properties” in your WordPress admin and click on the appropriate submenu option.  This will show you a list of options and slugs as shown below;

Once you have your field and selections added you will need to click the “Advanced” tab in the field properties in order to add the correct field name and default values

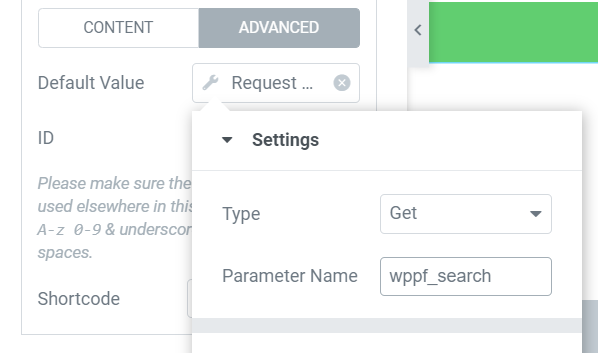
The default values only need to be set if your form is being displayed on the property archive page since you will want the form to reflect the search being performed in this case.  In that case for the default value select the dynamic tags and choose “Site > Request Parameter” from the drop down then in parameter name enter the form field id for this form item.

In all cases you will need to enter an ID for field and these need to be from the list below in order to make the search work.  Below also shows the ideal type of field to use for each value and what selections if any to set.  You may use as many or as few of these field options below and may add any as hidden field too.

ID Type Options
wppf_branch Select use slug value from “Branch” Taxonomy
wppf_search (comma separated list of; to-buy, to-rent, commercial) Select use slug value from “Property Areas” Taxonomy
wppf_location Text User entry, will search address/postcode for text
wppf_featured Checkbox or Select Value should be “yes” to search only featured properties
wppf_min_bedrooms Select or Number
wppf_max_bedrooms Select or Number
wppf_min_price Select or Number
wppf_max_price Select or Number
wppf_min_rent Select or Number
wppf_max_rent Select or Number
wppf_min_area Select or Number
wppf_max_area Select or Number
wppf_property_type Select use slug value from “Property Type” Taxonomy
wppf_status Select Status is a text value from the feed and can be any value so avoid using unless you want a specific search
wppf_user1 Select
wppf_newbuild Checkbox or Select “yes”
wppf_lettype Select Let type varies from feed to feed but generally will include “Student”, “Professional”, etc
wppf_furnished Select or Radio Furnished, Un-Furnished, Part-Furnished, Not Specified
wppf_soldlet Select hide or show – hide will hide an properties that are sold, let, let agreed, sstc – show will show all properties including sold and let
wppf_orderby Select price-asc, price-desc or latest, default is price desc unless search by location then default is nearest
wppf_radius Select or Number distance in miles from the location center for location searches only
wppf_records Select or Number number of records to return per page, -1 will return all records on a single page

Set Actions After Submit

In order to get the form to post to the property archive page with the settings in the field you will need to set the “Actions After Submit” action to “Property Search” as that will the set the correct path for the form.

Jupix and Vebra Property File Shortcodes

Originally Jupix alone had a Property File option but it now also applies to Vebra API properties.  Property file is an add on product that allows Valuation and Viewing widgets to be added you your site that will directly book these in your backend system checking for availability and giving your customers options on when to book these in.  You will need a subdomain and API key for property file and these are added under the Jupix tab in the WP Property Feed Settings in your WordPress Admin panel.  The default property template will launch the viewing widget when a visitor clicks the Request a Viewing link on the property detail page but you may want to add the widgets elsewhere so we have created two shortcodes to allow you to add them in.

[wppf_propertyfile_valuation class=’btn btn-success’ text=’Value Me’] [wppf_propertyfile_viewing class=’btn btn-success’ text=’Arrange a Viewing’ propertyid=”]

These shortcodes will output a link which is properly formatted to launch the required widget.  The valuation widget can be placed anywhere on your site as it does not depend on a specific property being viewed but obviously the viewing widget may only be used on the property page.

The shortcodes have two options  – class is used to pass through any addition styling css classes that you want added to the link and the text is the text that will be displayed in the link.  The viewing shortcode also has an additional option to pass through a specific propertyid which can be ommitted if the shortcode is used on a property details page (it is picked up automatically)

Oxygen Builder Walkthrough

Oxygen builder is a WordPress plugin that allows you to build entire themes and does away with themes altogether.  I guess if you got this far you probably know that already and want some tips on how to build a property theme that makes use of the properties from WP Property Feed.

Archive Page – Property search and results listing

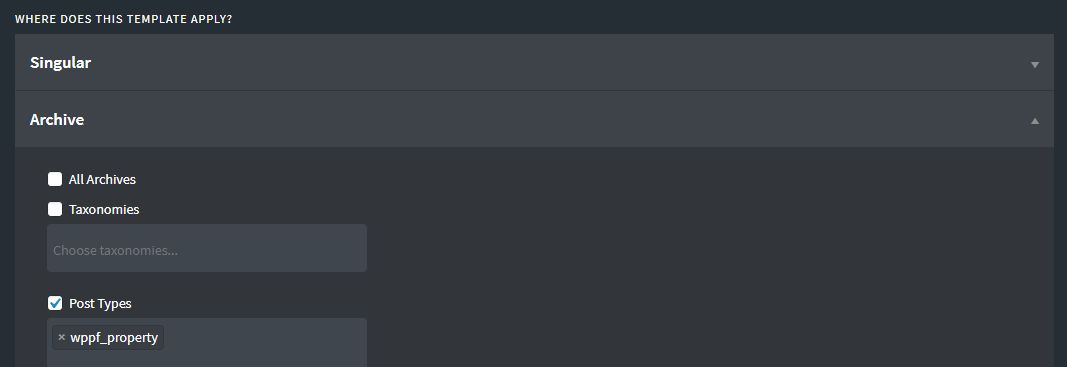
Probably the most important template you will need it a property search and results listing page.  The good news is that this is relatively simple with Oxygen.  First you need to go to wp-admin > Oxygen > Templates and click the “Add New Template” button to start building your template.  Give you template a name (I suggest “Properties”) and then click on “Archive” in the “Where does this template apply?” section.  In the options here tick the “Post Types” option and select “wppf_property” from the dropdown


Now you can “Publish” that template which will then reload the page with the “Edit with Oxygen” option available – click that and lets edit the template!

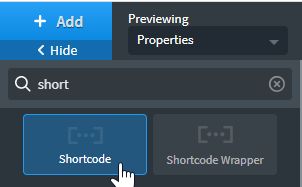
There are two key elements we suggest you use for building your search and results page, a search form and a results grid.  For the search form we are going to use our wppf_quicksearch shortcode, so click “Add” and find the “Shortcode” option and add that to your template.

In the shortcode options add the [wppf_quicksearch] shortcode and you will see the quicksearch form appear.

NOTE: To style the quicksearch shortcode layout we suggest you use css to override our base styles, you can also edit the layout of the quicksearch by editing the underlying template – see our Templates documentation for more details.

Okay so we have a search form, now we need a results section below to display the matching properties.  For this we will add a “Repeater” element (in the Helpers section).  Once added to your template you do not need to change the “Query” section as by default the results will be controlled by our search and results logic, but feel free to change any of the layout and pagination options.  Finally we need to add our property content to the template in whichever layout you determine.

In the repeater we would suggest that you add the Post featured image (main property image), Post Title (name of the property) and Post Excerpt (brief description of the property).  You can then add any of the property attributes which are stored as Post meta data.  In most cases when you add or edit an element there is an option to “Insert Data”

Which is turn gives you the options to select the type of data

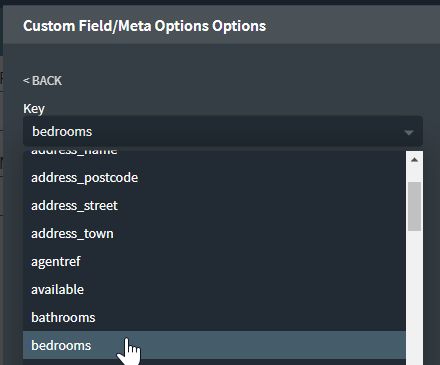
and finally if we are after specific property attributes we can select the attribute from the dropdown options

Using the “Insert Dynamic Data” we can pick out all the property features you may want for the results template.

Once you have your template complete you can view the search and results page by going to the standard wppf_property archive page https://www.yoursite.com/property (obviously change www.yoursite.com to the address of your site!).

Property Page

So to complete the search and results listing we need a single page for the property details.  So return to the wp-admin and Oxygen > Templates and “Add New Template”.  For this walkthrough I am calling my template “Property” and selecting the “Singular” from “Where does this template apply?” and selecting “Properties” so that this template only applied to property post types.  After publishing the template you can then “Edit with Oxygen” and as with the repeater on the archive page you can add Titles, text and meta data using the various Oxygen elements and “Insert Dynamic Data” options in those elements.

Picture Gallery, Floorplans and EPCs

There is one special case where we need to Oxygen a little help to pick up the correct data and that is to get the picture gallery, floorplans and EPCs.  We want all these images to be available to the gallery element in Oxygen and to do that follow these steps.

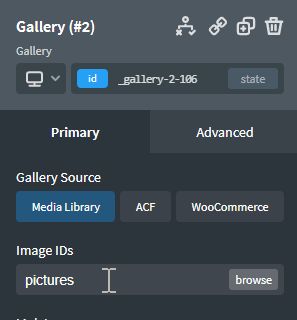
On your template add a “Gallery” element.   You will be presented with the options with seemingly no way of selecting the property picture gallery, floorplans or EPCs as the only “Gallery Source” options are “Media Library”, “ACF” and “WooCommerce” with no option to select “Insert Dynamic Data” (hopefully this will change in future Oxygen versions).  So in order to work around this issue we have added some filters that look for specific “Image IDs” text.  So to use the property pictures leave the “Gallery Source” unselected or select “Media Library” and then in the Image IDs enter either “pictures”, “floorplans” or “epcs” and this will immediately populate the gallery with the relevant images.

Once you have designed and completed your property template you will have a fully functioning property search and and results in place using all the data supplied via our WP Property Feed plugin.

Extras

Search Result Map.

If you want to display a map on your property results page with all the searched properties pinned to the map you will first need to add a code block to your property archive template at the top of the page with the following code;

<?php wppf_map_pins();?>

This primes the plugin with all the javascript property data needed by our plugin to populate the map.  Then on the same template add a div element making sure it’s id is wppf_map and set an appropriate width and height.  You will not see the map in the preview view but on the live results page the div placeholder will be replaced by a map with properties pinned to it.

Paragraphs, Documents and Branch Details

On the single property template there are extra post meta datafields that require a code block to display because they contain array data (rather than single values).  In all the examples below we have just echo’d out the basic data, you will want to amend the code to add in html formatting of the results.

Paragraphs

Paragraphs contain room names, dimensions and text so can be import additions to the overall descirption.  Use the following code to display the paragraphs

<?php
$paragraphs = wppf_get_paragraphs(get_the_ID());
foreach ($paragraphs as $paragraph) {
echo $paragraph[“name”]; //room name
echo $paragraph[“dimensions”]; //room dimensions
echo $paragraph[“description”];
} ?>

Documents

Usually there is just one document – the full details as a PDF but there may be more than one so this is another array element that needs adding as a code block like so;

<?php
$docs = wppf_get_documents(get_the_ID());
foreach($docs as $doc) {
echo $doc[“url”];  //the url of the document
echo $doc[“name”]; //name of the document
} ?>

Branch Details

Branch details is a taxonomy but as we add branch contact details to this taxonomy you will need a code block to extract the details as follows;

<?php
$branch = wppf_get_branch(get_the_ID());
echo $branch->name;
echo wppf_get_branch_address($branch->term_id, “<br>”);
echo get_term_meta($branch->term_id,”phone”, true);
echo get_term_meta($branch->term_id,”email”, true);
?>

We hope this was helpful!