Elementor Walk Through
How Can We Help?
This guide will help you through using the Elementor integration we have setup to get the most out of the Elementor Theme Builder which is part of the Elementor Pro package.
Requires Elementor Pro Version 2.9.4 or greater
Setting up the search listing page
In WP Property Feed all properties are a special Custom Post Type called properties. To see the property listings you therefore just need to go the the archive page for properties /properties/ on your site (no need to create a page as WordPress already has all this functionality built in). Now that you are using Elementor Pro you may want to style the layout of this page, here’s how;
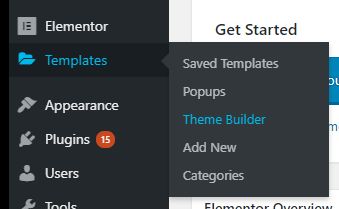
Step 1 : Create a new theme template for properties. In wp-admin select the Templates > Theme Builder menu option
Step 2: In the select the type of template you want choose “Archive” and give the template any name you like
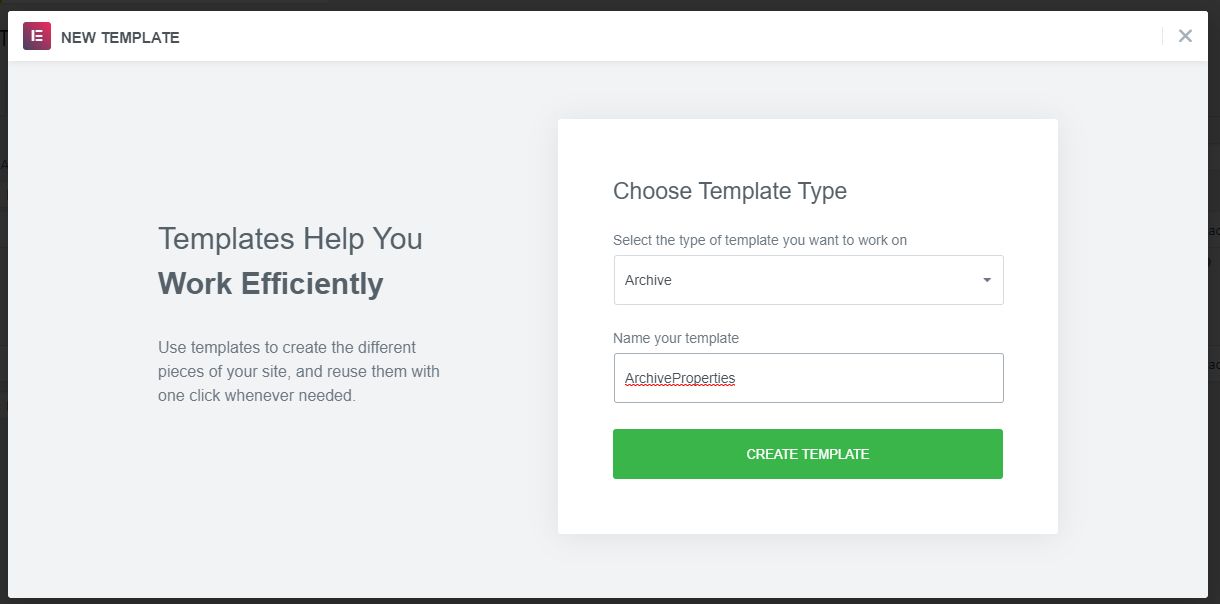
Click the “Create Template” and you will be taken to a library of templates. Just press the X in the top right to close this library.
Step 3 (optional): Normally we have a search bar at the top of the property listing page and for this we have created an Elementor widget. If you scoll down the widget section until you find the WP Property feed section then drag the Quick Search widget onto your new archive page.

Once you have this on the page you can play with all the normal Elementor settings and styling options to make it look as you want. UPDATE: You can now use the Elementor From widget to create your own form just remember to set the “Actions After Submit” to “Property Seearch”.
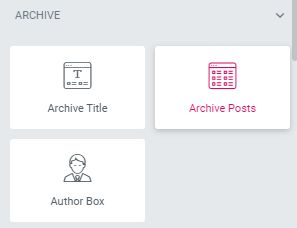
Step 4: Add the Elementor “Archive Posts” widget to your page.
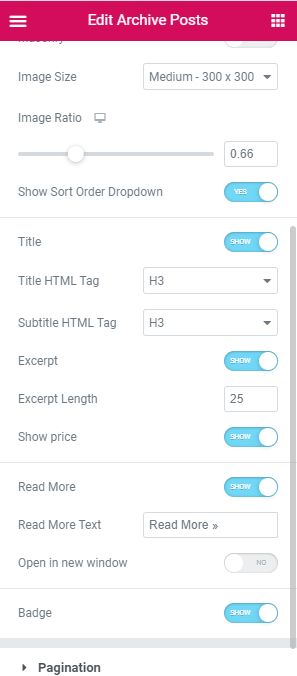
In the layout options for this widget we have created a “Property” skin to use for the display of property details and added specific options for showing the sort-order dropdown, sub-title display (displays the type of property rooms etc), show price, and badge display (For Sale, SSTC, etc). Again play with the settings to suit.
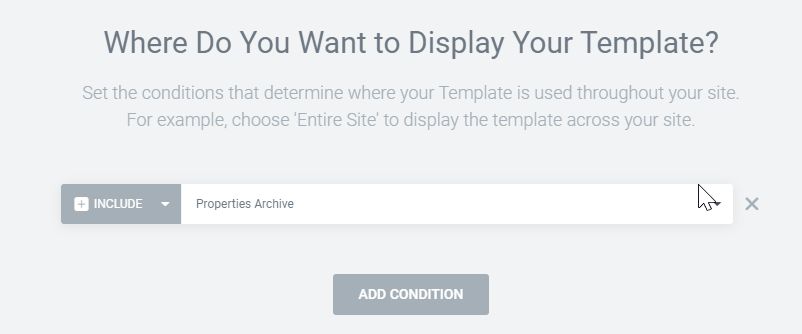
Step 5: Publish the template. When you press the publish button you will be thrown to the Publish Settings dialog where you will press “ADD CONDITION” and select “Include” and “Properties Archive” to make this template apply to the property archive page only.
You will now have an Elementor template setup for your search results. To see the template in action go to https://{yoursite.com}/property/
Setup a property details template
Next you will need a page to display the property details on a page, so that when you click through a property details you are using Elementor to style the results.
Step 7: Create a property details template
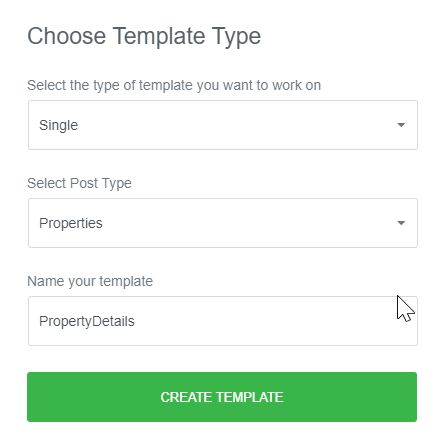
To do this again click on the wp-admin menu Templates > Theme Builder and then “Add Templete”. This time in the template box choose “Single” and the “Properties” post type and give the template a meaningful name.
Elementor Version 3 Update: The release of version 3 of Elementor has seen the above box modified to no longer include the “Select Post Type” option. Elementor will only now override pages that use the default page template so we have had to build in an override option in Settings > WP Property Feed > General to allow Elementor to override the base property template THIS OPTION MUST BE TICKED if you are using Version 3 or more.
Again close the library popup that appears so that you are in the Elementor designer.
Step 8: Using dynamic tags.
We have added a load of dynamic tabs to help you access the specific property details you will need to drop onto the template. As normal you will want to add the title and description as much of the property detail information is in those two settings. But you will also want to add specific property details which will be either text, media or galleries.
Text Tags: Text tags can be used in many places but the most common will be using the “Text Editor” widget. If you drag a widget onto the page and look on the content tab you will see the dynamic content tag icon.
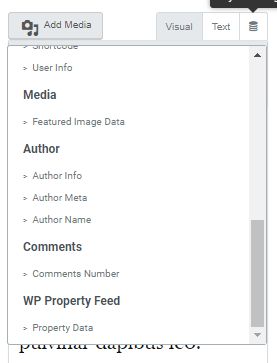
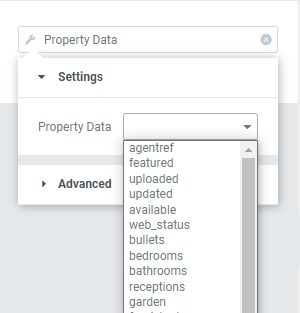
Click the cylinder button and from the drop down select “Property Data”. Once selected you will then see a settings spanner next to Property Data which you can click on to select the specific property data you require.
You can get property data into many of the various Elementor widgets this way.
Link Tags: We have created a number of link tags for items that only appear as links in particular the Brochure PDF can be found here. Use with button widgets or any other widget that allows linking.
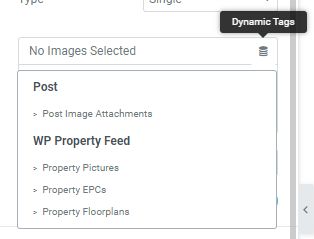
Gallery Tags: We have also created a number of gallery tags to display the various property images, floorplans and EPCs. If you drop a Galley Widget onto the page you will again see the dynamic tag icon with various WP Property Feed options for these. Try playing with these options
Maps: There is one special case for the Google Maps widget where you will want to add the address but the widget does not have the dynamic tags option. Fortunately it does allow you to select a “Post Custom Field” where you can enter the Custom Key “address_all” which will pull in the full location text to render the correct location.
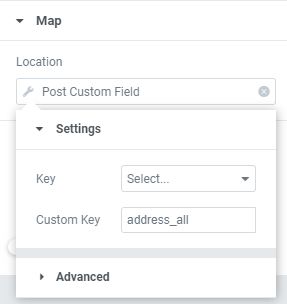
UPDATE: We have found that the standard Elementor map widget is not very accurate at locating properties using the address_all option and we now recomment using the “Premium Addons for Elementor” plugin which provides a much better Google Maps widget. This widget allows you to use the longitude and latitude values we provide in the property data tags which is much more reliable. Make sure you set both the map center and also the map marker to these longitude / latitude values.
Setp 9: Publish the template. At the default option will be to Include Properties which will then apply this template to all properties. At this point you could just “Save & Close” and your template for properties will be ready. However you may choose to design different templates for different property_areas. Property Areas (probably not well named, sorry!) are the main search divisions – to-buy, to-rent, commercial and developments. You may want to show details of rental deposits and let types for rentals but not for sale properties so having 2 different templates will allow you to modify the layout depending on the area. You could also do the same for Branches if you are a multi-branch agency for instance.
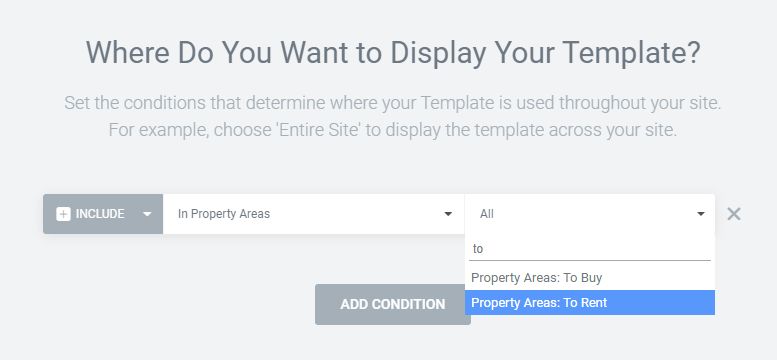
Setting this condition above will limit the template to Rental properties only.
Step 10: Other widgets
You may also want to add some property widgets to other pages too. For this there are 3 main widgets. We have already explored the “Quick Search” widget in the archive template, but this can also be dropped into any Elementor page you wish. You may also want to “Feature” some properties on some pages in your site. To do this you can use either the “Posts” or “Portfolio” widgets both of which work in a similar way. As an example we will take the “Post” widget setup.
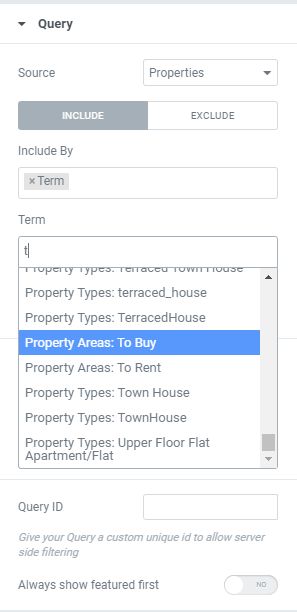
Add a “Posts” widget to your page and in the “Layout” section select “Properties” from the “Skin” option. This will add all the options you came across earlier in the “Archive Posts” widget, but this time you will want to select the specific properties you want to show in this widget. To do this click on the “Query” section of the widget and select “Properties” in the “Source” setting. To limit the properties returned to say “For Sale” properties you will click the “Include By” and “Term”, then in the “Term” box below enter “to-buy”.
You will also see an option to “Always show featured first”. Selecting this option will override the sort order options above it and display properties specifically marked as featured followed by the newest (if we don’t have enough featured properties to fill the grid). This is useful if you want to use the featured flag to highlight properties.
Other than that just play!